3 Simple DIY Home Decor Ideas


57003-1euna5ardsoum1nfpvvpz0a.jpeg

So you just moved into your new home. After months of back-and-forth phone calls with movers, cleaners and insurance companies and so many trips to the storage unit, the hard part is finally over and the fun begins.

Here are 3 easy ways to kick off your home decorating with some fun, cost efficient, DIY projects.

1. Clothespin Planters

We found this great idea on The Copper Anchor. It’s suuuuuper simple and only requires 4 items (you can probably get away with 2).


450d7-1dbldkrvxmxddcjurhwvmvq.jpeg

What you’ll need:

Note: These instructions are to make 3 planters. You can make as many or as few as you want!


9d0c2-1kjzz3gbtezqu5jl8qink5q.jpeg

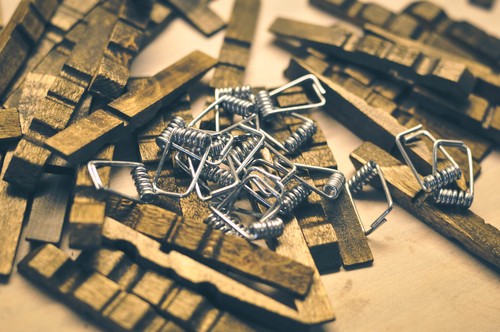
Step 1: Disassemble the clothespins. Make sure you keep track of all the metal brackets. You’ll need them to put the clothespins back together later.

Step 2: Use the stain marker to color the wooden parts of the clothespins. Lay out a piece of paper or other cloth under your work station to avoid making a mess.

Once you’re all done coloring, let the wood pieces dry overnight before reassembling them with the metal fasteners. This is the most tedious part of the process, but it’ll be worth it. Trust us.

Step 3: Make sure your tuna cans are completely empty and cleaned (you might want to run them through the dishwasher an extra time to avoid any fishy odors on your planters).

Once they’re clean, give them 2–3 coats of spray paint and then let them dry overnight with the clothespins. Make sure you paint all sides of the can.

Step 4: Now that your clothespins are colored and reassembled and your tuna cans are painted, it’s time to turn them into planters! Just clip the pins around the rim of the can until they complete a full circle.

And Voila! You’re all done. Fill the planters with whatever type of plants you like.


81865-1fbupwhyh_qibxeixmpvgyq.jpeg

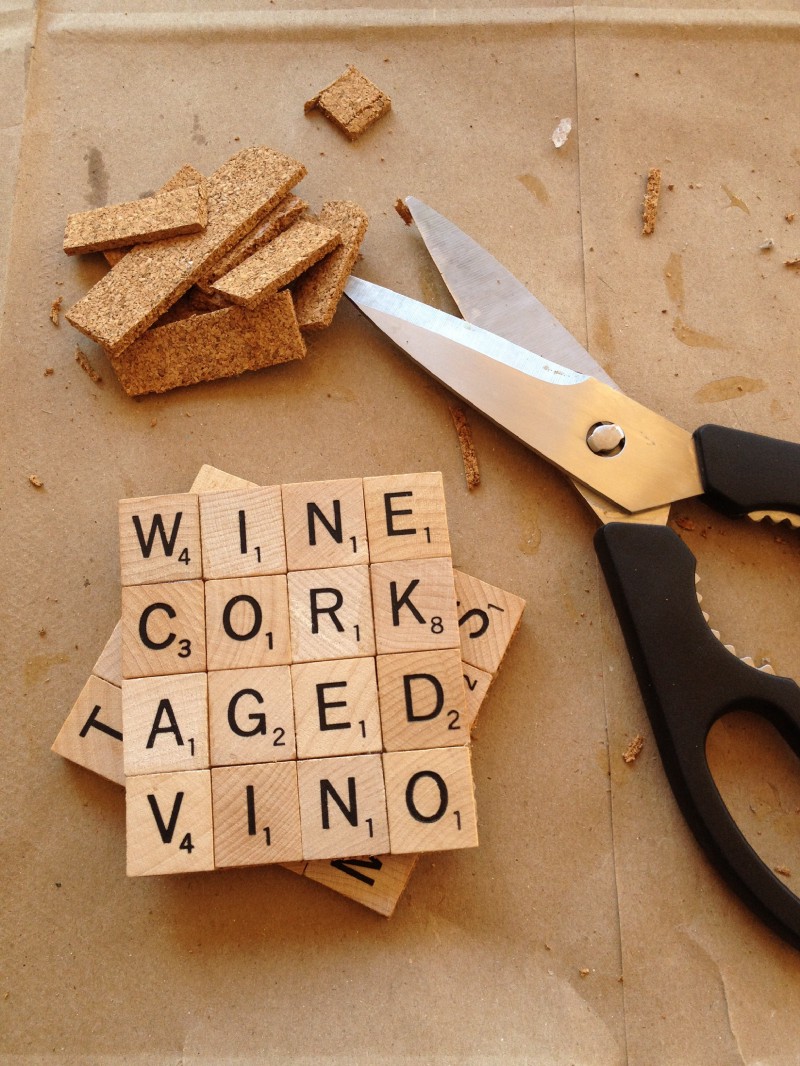
2. Scrabble Coasters

Struggling to find enough closet space in your new apartment for all those old board games that you had great ambitions of playing every weekend but never really got around to? Repurpose! Use some of the pieces to make these cool DIY Scrabble coasters. (This one comes from The Gourmet Gab.)


da9f3-1yj3ixp7w_j5d5tvrrlv_3w.jpeg

What you’ll need:

Step 1: Use the craft adhesive to glue the Scrabble pieces to the cork board. It helps to also get a little glue in between the pieces where they meet to hold them in place. Once the entire coaster is glued, allow it to set for the amount of time specified in the adhesive you chose. We recommend laying a heavy object like a book on top of the coaster to make sure it dries flat.

Step 2: Using the scissors or X-Acto knife, trim the excess cork board away from the tiles. You’re going to want to take your time and get as close to the tiles as you possibly can for best results.


b0503-1i0mjpd1jm7vxor-b9wrasa.jpeg

Step 3: Lay the coasters out on a piece of newspaper or a paper bag and coat them with the Polyurethane Spray. We recommend at least 2 coats to ensure that they have a waterproof seal (make sure you follow the instructions on the spray bottle for dry time and application technique).

After the coats of polyurethane dry, you’re all done. Pour yourself a glass of wine, celebrate your move, and test out the new coasters!

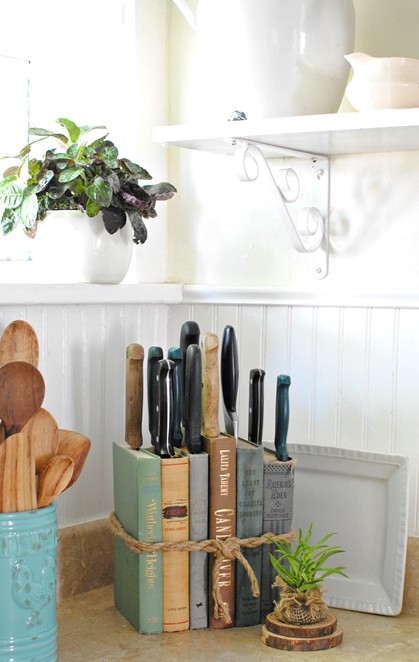
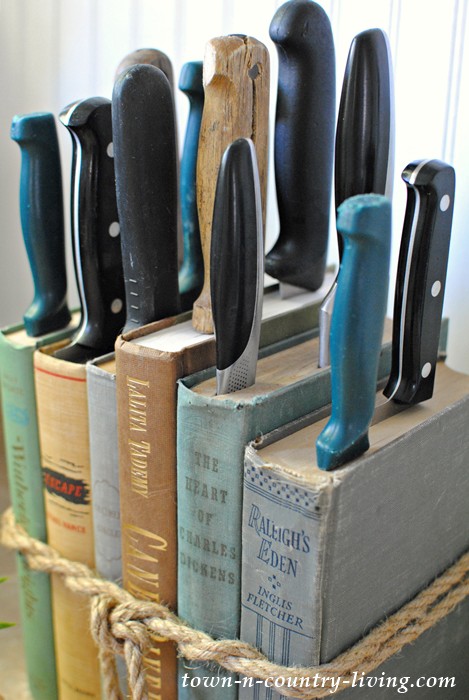
3. Refurbished Book Knife Holder

How many books do you have that you haven’t touched in years? I bet you never realized how big the number actually was until you moved and had to find a way to transport and store all of them in your new place. Get some of them out of the way and use them for this DIY knife holder c/o Town and Country Living!


f5b2f-1fftmoyse-cncptskafea9g.jpeg

What you’ll need:

  • 5–6 old books, preferably hard cover (this number varies depending on the thickness of the book and the number of knives you have)

  • Rope/ string

Step 1: Choose an appealing color palette of books. You should keep in mind the colors of your kitchen and the aesthetic you are going for. This is really up to you, but a variety of colors probably works best.


2772c-1qft1eytab_debdylafmoeg.jpeg

Step 2: Cut a piece of rope big enough to wrap around the books once or twice. You can intertwine the ropes or simply wrap them around the books.

If you know how to tie any decorative knots, those will look best. Otherwise a simple knot or bow will do the trick just as well.

You can find a list of some cool decorative knots here.

*Tip: Make sure you don’t tie the rope too tight. You want the books to fit snug but not so tight that you won’t be able to fit the knives in later.

Step 3: Once the books are arranged how you like and the rope is tied, insert the knives, and you’re done! Enjoy your brand new knife holder and the new free space on your bookshelf.


e024e-1n6lppvl5lunw7iry-a6bfa.jpeg

Thanks for reading! If you liked this post, please recommend or share it with others. 🙂

Want to talk? Connect with Moved on Facebook, Twitter, and Instagram!

How to Paint Your Home

In some ways, painting is as simple as can be: apply paint to wall until fully covered. There is a system to painting, however, and a few tricks that can help you avoid common mistakes and pitfalls. Whether you’re sprucing up your old home or your new one, follow these guidelines for a stellar paint job.


449b6-1ewfotqc4r7xc7339lbewww.jpeg

Preparation

Half of a good paint job is in properly preparing the space. These tips apply to both interior and exterior paint jobs.

  • Cover the floor/ground: You can use plastic sheets, old bed sheets, rugs, patches of carpet — whatever is handy and you don’t mind getting paint on.

  • Stir the paint: Doing so will ensure your walls all turn out the same color, so don’t skip this step!

  • Wash the walls: Dirty walls leads to poor paint jobs. Give your walls a good once-over to ensure proper paint adhesion.

  • Fill holes: Examine the walls and door/window frames for nail holes, deep scratches, chips, etc. and fill them up with spackle or caulk, depending on their size. Smooth out with sand-paper afterward to ensure smooth paint coverage.

Basic Guidelines

  • 2–3 coats will usually provide the best coverage. Always wait until each coat is fully dry before starting on the next coat.

  • Wrap paint brushes and paint cans in plastic when taking breaks: This will keep your brushes from drying out.

Interior Paint Jobs

  • Paint from top to bottom: Start with the ceiling and work your way down, leaving the doorframe and doors until last. If you’re applying multiple coats, finish each section before moving on to the next — e.g. finish both coats on the ceiling before tackling the walls.

  • “Cut” the room first: The bulk of your painting will be done with a roller. Before you use a roller, however, you want to use a smaller brush to paint all the edges in the room, i.e. “cutting” the space. Cut where the wall meets the ceiling, the corners of the walls, around window sills and door frames, and above baseboards. Paint a 4–5 inch swath from the edge, so that you can easily finish with a roller later.

  • Using the roller: Use an extender with your roller so you can paint from floor to ceiling in a single stroke. This will ensure a smooth paint job, without dimples and uneven patches. Painting a “W” on the wall with a wet roller, then smoothing in the section will also help to keep the wall evenly loaded with paint.

Exterior Paint Jobs

  • Paint from top to bottom: The same rule applies outside as inside. Start with the gutters/eaves and work your way to the ground.

  • Paint in the shade: Weather permitting, paint in the shade as much as possible, to avoid over-drying in the sun.

  • Paint clapboard side-to-side: Paint 4–5 boards at a time to minimize overlap marks, and begin painting where two boards meet.

  • Keep an eye on the weather: It probably goes without saying that rain will ruin a fresh coat of paint! Also avoid painting in weather below 50 degrees.

Clean Up

  • Clean your brushes: If you want to use your brushes again, use a brush cleaner and water or a solvent (if necessary) to clean your brushes thoroughly. Wrap them in paper towels to dry.

  • Proper paint disposal: Empty cans of latex paint can be tossed out with the trash, once dry. Alkyd paints need to be given to special hazardous waste companies.

Now that you know how to complete a stellar paint job, you need the tools to do so! While you could head over to the hardware store to pick up some supplies, why add yet another errand to your to-do list?

Instead, head over to PaintZen! PaintZen is a full-service painting company that takes care of everything. Step 1: Go here. Step 2: Enter your job info. Step 3: Get a free quote. Step 4: Have all of your painting done.

It’s that simple. Happy Painting! 🙂

Thanks for reading! If you liked this post, please recommend or share it with others. 🙂

Want to talk? Connect with Moved on Facebook, Twitter, and Instagram!

The Top 5 Rental Truck Companies

If you’ve decided to move yourself, and you want to hire a rental truck, you should know what options are available to you. While most cities will have many local options for you to choose from, there are five major national rental truck companies: U-Haul, Budget, Penske, Ryder and Enterprise.

Here’s what you need to know about each one:

U-Haul

U-Haul is by far the most popular and well-known rental truck company out there. Here are some notes…

  • Over 20,000 locations across the U.S.
  • Widest selection of truck rental options: pickup trucks, cargo vans, 10’, 15’, 17’, 20’, 26’ trucks. Added bonus: even their smallest truck (10’) can tow vehicles.
  • A number of cargo, utility and car trailers available for rent.
  • U-Box containers: these are basically portable storage containers.
  • One month of free self-storage with one-way equipment rentals.
  • Guaranteed reservations: if the equipment you reserved is unavailable when you need it, you get $50.
  • Storage/packing materials available for purchase: boxes, tape, furniture pads, plastic wrap, bubble wrap, etc.
  • Reserve with cash, credit or debit cards.
  • Offers one-way move options (good for long distance moves).

Budget

  • Four different vehicle options: cargo van, 12’ 16’ and 24’ trucks. The 16’ and 24’ trucks both have 3 seats available in the cab, tow capacity and a loading ramp for easy loading.
  • Car carriers and tow dollies available for rental.
  • You can also rent furniture pads and hand trucks (dollies).
  • No reservation guarantees. Of course, Budget claims they do not overbook, but sometimes overlap can happen, and if it does, you’re left in the dust.
  • Credit card required for reservations.
  • Offers one-way move options (good for long distance moves).
  • Discounts for military, veterans, students, police, fire and EMT, AARP, motor club and Bar Association members.

Penske

  • Large fleet of over 50,000 trucks, which Penske claims are the newest and best-maintained vehicles in the business.
  • 2000 pick-up/drop-off locations, including all Home Depot locations.
  • 12’, 16’, 22’, 24’ truck rental options. Loading ramps and vehicle towing available on the three largest truck options.
  • Packing supplies available for purchase, including boxes, tape, furniture pads, mattress bags, hand trucks, box cutters, bubble wrap, etc.
  • Offers vehicle towing equipment rentals and self-storage options.
  • Guaranteed reservations if made 48 hours in advance.
  • Offers one-way move options (good for long distance moves).
  • Discounts for military, veterans, students.

Ryder

  • 500 pick-up locations across the continental US.
  • Rental options include cargo vans and 20’ and 26’ trucks, both of which have lift-gates.
  • No vehicle towing options available for rental and you are not allowed to tow your own trailer if you have one.
  • Does not offer one-way move options, so best for local moves. You can take the truck as far as you want, but you’ll have to return it to the same place from which you picked it up.
  • Credit card required for reservations.

Enterprise

  • 250 pick-up locations across the continental US.
  • Many rental options: 15’, 16’, 24’, and 26’ trucks, ½ ton, ¾ ton and 1 ton pickup trucks and five cargo van options. The largest three trucks have lift gates.
  • No vehicle-towing equipment available for rent. To tow your vehicle, you’d need to rent the ¾ ton or 1-ton pickup truck and use your own car carrier or tow dolly.
  • No one-way rental options, so only good for local moves.

For more information on rental trucks, check out our guide on Finding the Best Rental Truck Deal.

Thanks for reading! If you liked this post, please recommend or share it with others. 🙂

Want to talk? Connect with Moved on Facebook, Twitter, and Instagram!
3 DIY Home Repair Tips to Get Your Security Deposit Back

You may think you’ve been a model tenant these past months.

But once the question of getting your security deposit back comes around, you start noticing things. Like that dent in the kitchen from when you slipped and plunged your elbow into the wall. And that scratch in the floor from trying to find an outlet behind your dresser. And the nail and screw holes all over the walls!

Fear not — we’ve put together the following list of DIY home repair tips for you. Follow these tips and you’ll be sure to get your security deposit back!

Patching Small Holes in Walls

What you’ll need: putty knife, spackle/joint compound/caulk, patch kit, sandpaper, paint

What to do: For holes quarter-sized and smaller, simply scrape away loose debris from the hole, then fill with joint compound. Smooth it out with the putty knife, wait for it to dry, then smooth it completely with sandpaper. Paint over the patch and you’re done!

For larger, doorknob-sized holes, you’ll need a patch kit. This is a square of self-adhesive mesh. Cover the hole with this patch, then cover the patch with joint compound, feathering the edges so it blends into the wall. Let dry, sand smooth, and repeat with a second coat. Let dry and paint over.

Patching Large Holes in Walls

What you’ll need: utility knife, putty knife, spackle/joint compound, drywall, drywall tape, wood board, saw, electric drill, wood screws, sandpaper, paint

What to do: Use the utility knife to cut out a square/rectangle around the hole. Cut a piece of drywall to fit the square/rectangle you just cut. For holes around 6-inches, you can get away with just popping in the drywall patch you cut.

For holes larger than 6-inches, you’ll be better off using a wood board to support your drywall patch, so it doesn’t crack. If you need to, cut a wood board to be a few inches longer than the height of your patch hole. Place the wood board in the wall, behind the drywall, and screw it into place, top and bottom.

Place your drywall patch in the square/rectangle you cut, screwing it into the wooden board if applicable. Tape around the edges of the patch with drywall tape, then use the putty knife to spread some spackle/joint compound along the drywall tape. Let dry, sand till smooth and repeat with a second coat. Let dry again, then paint over.

Fill Scratches in Wood Floors/Furniture

What you’ll need: Steel wool, sandpaper, mineral spirits, plastic putty knife, wood filler, natural bristle brush, varnish/ polyurethane. Or crayons!

What to do: Smooth out the scratch with steel wool (for lighter scratches) or sandpaper (for deeper scratches). Make sure to follow the wood grain when doing this. Rub mineral spirits over the scratch to further smooth it out and clean up the fine dust from sanding.

Using a plastic putty knife (to avoid further scratches), fill in the scratch with wood filler that matches the color of the rest of the floor/furniture. Let dry, smooth out with light sandpaper and clean up the dust. Finish off with varnish or polyurethane to match the rest of the floor.

Or, pick a crayon that closely matches the color of the scratched wood, melt it in a microwave over greaseproof paper, and then use a putty knife to fill in the scratch!

For more help getting that security deposit back, make sure to read our two guides on properly vacating an apartment, here and here.

Thanks for reading! If you liked this post, please recommend or share it with others. 🙂

Want to talk? Connect with Moved on Facebook, Twitter, and Instagram!
Finding the Best Rental Truck Deal

So you’ve decided to move yourself — congratulations! Now it’s time to find a rental truck.

In this article we lay out the different options available to you, what is typically offered by most companies, and some tips to make sure you get the best deal out there.

What Can You Get

Vehicles — This is where rental truck companies most clearly differ. Most companies offer cargo vans, and couple truck options, ranging in size from 10 feet to 26 feet.

  • Cargo vans and trucks in the 10–12ft range are usually enough for kids moving to and from college and those moving out of studio apartments.

  • Medium-sized trucks in the 14–17ft range are good for small apartment or homes in the 1–2 bedroom range.

  • Large trucks, 12–26 feet are perfect for larger, 3–4 bedroom places.

Other rental options — Some companies also offer other rental options, such as portable storage units, trailers, and car-towing. There are two car-towing options: the tow dolly, where the car’s back wheels roll along the road, and the car carrier, the more expensive option in which the vehicle is fully off the ground.

Local vs. long-distance — Some truck rental companies offer both local and long-distance move options, but not all. For local moves, you’re required to drop off the truck at the same location from which you picked it up. Long-distance moves allow you to drop off the truck at a new location nearby your home. Making sure there is a location near your new home will factor in your choice of rental truck companies.

Insurance — Most basic contracts will include minimum liability insurance, but this usually won’t cover much. You do have multiple options for extra insurance:

  • Supplemental liability insurance — Generally maxes out at $1 million.

  • Damage waivers — Covers accidental damage to rental truck, and usually includes theft.

  • Auto tow protection — Covers damages to car-towing equipment.

  • Personal accident insurance — Covers your medical costs, though these will usually be covered already by your health insurance or car insurance if you have medical coverage

  • Cargo insurance — Covers your belongings in case of damages

How to Get the Best Deal

Be realistic — First things first: forget about the stickers you’ve seen on the sides of rental trucks advertising $19.99! Depending on the specifics of your move, a few hundred dollars is a much more reasonable amount to budget for. If you’re moving a large house long-distance, you could be looking at $1000–2000.

Book in advance — Truck rental prices are based on demand, a lot like airline tickets. This means that booking right before the move will be more expensive. The companies know you need the truck, so they’ll jack up the price. So book far in advance for the best price.

Book at the right time — Just like with moving companies, the cheapest time to rent a truck is in the middle of the month, in the middle of the week, in the middle of winter. As much as you can, avoid booking on weekends, at the end of the month and during summer, when demand is highest.

Look around — Make sure to get quotes from every moving truck company, and try playing around with different dates, and different pickup and drop-off locations in each city. Some companies offer competitive pricing, so once you find an especially cheap rate (say, from a coupon or discount deal), bring it to another company and see if they’ll offer you a better deal.

Thanks for reading! If you liked this post, please recommend or share it with others. 🙂

Want to talk? Connect with Moved on Facebook, Twitter, and Instagram!

5 Tips to Crush a Move All by Yourself

So you’ve taken the leap and decided to tackle your move by yourself, huh?

Well, we applaud your courage and can-do attitude, as we know all too well the craziness of a moving on your own. To keep you sane, organized and moving forward, here are 5 tips to keep in mind:

1. Write Everything Down

One of the most difficult parts of moving yourself is keeping things organized. Not only do you have to keep track of all your stuff, but you have to remember all the little tasks that moving brings along with it, such as updating your address with the government, setting up utilities, and getting rid of extra stuff (a Moved concierge can do all of this 😉).

So help yourself out and create a massive to-do list early on in the moving process. Start with all the questions you need to ask (who can help me move?, where will I stay on my way to my new house?, what do I want to bring?, etc.) and all the tasks you can think of that you will need to complete.

Keep this in a notebook, on your computer, or in the Moved app so you can update it and cross things off throughout the processs.

2. Purge

We’ve said it many times before on this blog, and we’ll say it again: the less stuff you have, the less you have to move! Check out our other guides for help on what to get rid of and how to properly sell, donate, or throw away your stuff.

3. Use What You Have

Why buy moving pads when you have a house full of linens, blankets and towels? Save some money and use what you’ve got lying around to protect your things while moving. Keep in mind, however, that you’ll be setting yourself up for a ton of laundry to do on the other end.

You can also use all the boxes, trunks, laundry baskets, etc. you already own to move your things. Keeping your clothes in dresser drawers will save you a lot of packing time! Just take out the drawers, tape a blanket or towel on top to keep everything inside, and you’re good to go!

4. Get the Right Tools

Rent a dolly from U-Haul or a moving company, and you (and your back) will be thankful later, I promise! Box dollies are two wheeled, stand upright and are great for moving multiple boxes at once. Flat furniture dollies are basically wooden rectangles with four wheels on them. These babies can hold up to 900lbs and are essential for moving heavy items like large screen TVs and dressers.

Make your life easier and rent reusable boxes from a company like Gorilla Bins or Bin-It. The boxes will be delivered to you and picked up when you’re done with them, saving you the hassle of buying boxes, hunting for used ones or figuring out what to do with them when you’re done.

5. Pack and Load Smart

Don’t leave yourself a mammoth packing job to finish at the last minute or you’ll be overwhelmed and nearly crazy by the end of the day. Plan ahead, slowly packing everything you own over the weeks leading up to the move. Starting with what you rarely use and finish with the daily essentials.

Finally, when loading your truck, remember that heavier items go in first, and on the bottom. Strap everything down and don’t exceed your truck’s weight capacity.

Thanks for reading! If you liked this post, please recommend or share it with others. 🙂

Want to talk? Connect with Moved on Facebook, Twitter, and Instagram!

Do It Yourself Interior Design

Moving into a new home is the perfect time to experiment with some DIY interior design. Everything is already in flux, so you might as well tackle those design projects you never got around to in your last home! The phrase “interior design” may conjure up thoughts of expensive home makeovers, but fortunately, there are many ways to spruce up your new home on a budget.

Here are a few fun ideas to get you started!

Removing popcorn ceiling.

Getting rid of the spackle on your ceilings is not as hard as you might think. If you want a smooth ceiling, use a soaked roller to saturate the popcorn with water, then simply scrape it away with a spackle knife. You can also skip this step entirely and just cover up your ceiling with thin tongue-and-groove wood planks or faux-tin Styrofoam tiles.

Custom design with Sharpies.

Take out the inserts of pillows and use a ruler and some Sharpies to add custom graphic designs to your couch pillows. No need to go overboard here — simple lines or grids can go a long way.

Easy-install wall molding.

Adding trim molding to your walls is an easy way to add character to your home. Head to Lowes or Home Depot for some pre-primed trim-board. Use wood-glue to fix it to the wall, secure with nails, add some caulk and paint and you’re done!

The illusion of extra space.

Hanging mirrors is an age-old trick to make hallways and small rooms seem larger than they actually are. Another way to make a small room appear larger is to decorate with low-slung furniture that stands on legs, so you can see the floor underneath. Certain paint colors can also help, such as PPG Paints Swirling Smoke, Benjamin Moore Cloud White, and Farrow & Ball Skylight.

Open up cabinets.

Add some character and space to your kitchen by removing cabinet doors. You can also now add a piece of art to the back wall to pretty up the space!

Paint, paint, paint.

Paint is one of the easiest, cheapest ways to transform your home. Experiment with different hues for the kitchen, bathrooms and bedrooms. With a few coats of paint, you can also spruce up dingy items found at estate sales or thrift shops, such as old dressers, vases or frames.

Bring in the nature.

Scattering plants around the house is a wonderful way to breathe some life into the room… literally! Succulents are super easy to take care of, and some plants will purify the air in your home, such as spider plants, snake plants, golden pothos, and aloe vera.

Use the rule of three.

Interior design experts have known for years this simple styling secret for surfaces like coffee tables, mantels, and hallway dressers. Use three objects, of different sizes and shapes: something tall and vertical, something wide and horizontal, and something curvy and sculptural to tie it all together.

Hang artwork right.

Hang artwork so that the center of the piece is around 57 inches from the floor; this is the average sightline for most people.

For more tips on making your new house or apartment feel like home, make sure to check out our guide on the topic, here.

Thanks for reading! If you liked this post, please recommend or share it with others. 🙂

Want to talk? Connect with Moved on Facebook, Twitter, and Instagram!