U-Haul Signs Exclusive Partnership with Moved to Support the Multifamily Industry and Renters

PHOENIX (Oct. 27, 2023) — U-Haul®, the industry leader in DIY moving and self-storage, today announced an exclusive partnership with resident technology company Moved™.

The agreement includes exclusive rights for both U-Haul and Moved’s business-to-business-to-consumer (B2B2C) software, which streamlines the onboarding and offboarding process for tenants of multifamily communities.

It’s a first-of-its-kind commercial agreement for U-Haul, which has been providing movers with affordable mobility solutions since 1945. This also marks the first outside investment of U-Haul in a software firm.

The U-Haul Tenant Moving Services division is an ideal partner for Moved, which addresses the need of multifamily housing owner-operators to offer tenants an easy and efficient “one-stop shop” for move-in and move-out services.

Visit Moved.com to learn more, or book a demo here.

“Renters have been turning to U-Haul for 78 years, and we’ve been there with the expertise to help,” stated John “JT” Taylor, President of U-Haul International.

“This partnership is another way for us to reach renters and make their moving experience better. It puts the world’s largest DIY moving fleet at their fingertips, as well as U-Haul self-storage, U-Box portable moving containers, moving supplies, and localized access to 7,000 Moving Help Service Providers® and 23,000 U-Haul rental locations. Putting customers first is what U-Haul is about. Moved is another way to help us achieve that.”

Renters move every two years on average. As the multifamily housing landscape continues to change, owner-operators face challenges like increasing costs, lower occupancy rates, and evolving resident expectations.

When residents move in (or out) of apartments, they anticipate a smooth and user-friendly experience. Moved and U-Haul help alleviate stress and improve tenant satisfaction while providing the most cost-effective solutions.

Moved streamlines administrative tasks for management companies, reduces inefficiencies, and, most importantly, provides a better moving experience for tenants.

“Moved is on a mission to eliminate stress from moving – for multifamily owners and operators, as well as their residents,” stated Adam Pittenger, CEO of Moved. “Partnering with an iconic brand like U-Haul marks a significant milestone in our journey to achieving that goal and delivering a world-class moving experience.”

About U-HAUL 

Founded in 1945, U-Haul is the No. 1 choice of do-it-yourself movers with more than 23,000 rental locations across all 50 states and 10 Canadian provinces. The enhanced U-Haul app makes it easier for customers to use U-Haul Truck Share 24/7 to access trucks anytime through the self-dispatch and self-return options on their smartphones through our patented Live Verify technology. Our customers’ patronage has enabled the U-Haul fleet to grow to 192,200 trucks, 138,500 trailers and 44,500 towing devices. U-Haul is the third largest self-storage operator in North America with 959,000 rentable units and 82.3 million square feet of self-storage space at owned and managed facilities. U-Haul is the top retailer of propane in the U.S. and the largest installer of permanent trailer hitches in the automotive aftermarket industry. We were recently named one of America’s Best Large Employers (Forbes, 2023); a Best for Vets Employer (Military Times, 2022); and one of the Healthiest Workplaces in America (Healthiest Employers, 2022). Find careers at uhauljobs.com. Get the U-Haul app from the App Store or Google Play.

About Moved

Moved is a fully integrated, web-based software platform designed specifically for multifamily communities to create efficiency on-site by automating the move-in and out process, delivering an unforgettable experience for residents, and driving ancillary revenue. The interface guides residents through tasks required by the property they’re moving to or from – everything from uploading renters insurance, reserving elevators and loading docks to scheduling key pick-ups. This transparent, self-serve dashboard makes moving easy for residents while automating tasks for property management teams. Moved is an open platform that integrates easily with Yardi, RealPage, ResMan, Entrata, and more.

How to Find a Roommate for Your Apartment

Whether you’re moving to a new city or just looking for a new roommate in your current one, finding the right person to share your living space with can be challenging. After all, you want to ensure that you live harmoniously with your new roommate. Luckily, there are several effective strategies you can follow to find the perfect roommate for your apartment. In this blog post, we’ll walk you through the process step by step.

1. Start by making a list of what you want in a roommate.

Every person is unique, and so is their ideal roommate. To kickstart your roommate search, begin by creating a roommate wish list. Consider the following factors:

-Personality traits: Do you prefer an introverted, laid-back roommate or someone outgoing and funny?

-Cleanliness: How important is it that your roommate keeps the shared space clean?

-Relationship: Are you looking for a close friend or merely someone to share expenses with?

-Number of roommates: Determine whether you’re comfortable with more than one roommate.

Additionally, think about your own qualities and preferences, such as your cleanliness habits and lifestyle. This self-reflection will help you identify what you truly value in a roommate.

2. Turn to friends, family, and coworkers to find a trustworthy roommate.

Your existing social network can be a valuable resource when searching for a roommate. Reach out to friends, family members, and coworkers to inquire if they know anyone who’s also in need of a roommate. While this approach can be convenient, remember that compatibility as friends doesn’t always translate to compatibility as roommates. Ensure that your prospective roommate aligns with your wish list and lifestyle.

3. Go online to find your new roomie.

If your personal connections don’t yield a suitable roommate, it’s time to explore online options. Leverage your social media networks to cast a wider net. Platforms like Facebook, Instagram, and Twitter can be used to announce your roommate search to your network, and you may even find relevant groups and hashtags to join. This outreach can help you connect with potential roommates or those who can introduce you to potential candidates.

Additionally, consider using roommate finder apps like RoomieMatch and Circle, which are specifically designed to connect people seeking roommates. These apps often use algorithms to match you with individuals who share your schedule, interests, and preferences.

4. Ask the right questions when you find a potential roommate.

Once you identify a potential roommate, don’t rush into signing a lease together. Ask detailed questions to ensure compatibility:

-How often do you clean?
-Have you ever paid your rent late?
-How often do you have parties or invite friends over?
-What is your daily schedule like?
-Do you have pets or plan to get one?
-What is your preferred thermostat temperature?
-Do you smoke?

5. Decide what’s important to both roommates.

Open and honest communication is crucial when selecting a roommate. Discuss these key topics:

-Rent: Determine the amount each roommate is willing to contribute and how expenses will be divided.
-Apartment amenities: Decide on must-have amenities and preferences.
-Apartment size and room allocation: Agree on the apartment’s size, number of bedrooms, and how rooms will be assigned.

6. Write and sign a roommate agreement before taking the plunge.

Before signing a lease, create a roommate agreement between you and your potential roommate. This document outlines rules and expectations, helping prevent conflicts down the line. Key elements to include in the agreement are:

-Payment responsibilities for utilities and communal expenses.
-Cleaning schedules and chore assignments.
-Guidelines for noise levels and guests.
-A roommate agreement provides clarity and sets the foundation for a harmonious living arrangement.

7. Use Moved to coordinate your move-in details with your roommate.

Moved allows both you and your roommate to coordinate and complete all your move-in tasks in one place.

By following these steps and considering technologies to manage living and moving with a roommate like Moved, you can simplify the process and enjoy a living experience with your new roommate.


5 Tips to Crush a Move All by Yourself

So you’ve taken the leap and decided to tackle your move by yourself, huh?

Well, we applaud your courage and can-do attitude, as we know all too well the craziness of a moving on your own. To keep you sane, organized and moving forward, here are 5 tips to keep in mind:

1. Write Everything Down

One of the most difficult parts of moving yourself is keeping things organized. Not only do you have to keep track of all your stuff, but you have to remember all the little tasks that moving brings along with it, such as updating your address with the government, setting up utilities, and getting rid of extra stuff (a Moved concierge can do all of this 😉).

So help yourself out and create a massive to-do list early on in the moving process. Start with all the questions you need to ask (who can help me move?, where will I stay on my way to my new house?, what do I want to bring?, etc.) and all the tasks you can think of that you will need to complete.

Keep this in a notebook, on your computer, or in the Moved app so you can update it and cross things off throughout the processs.

2. Purge

We’ve said it many times before on this blog, and we’ll say it again: the less stuff you have, the less you have to move! Check out our other guides for help on what to get rid of and how to properly sell, donate, or throw away your stuff.

3. Use What You Have

Why buy moving pads when you have a house full of linens, blankets and towels? Save some money and use what you’ve got lying around to protect your things while moving. Keep in mind, however, that you’ll be setting yourself up for a ton of laundry to do on the other end.

You can also use all the boxes, trunks, laundry baskets, etc. you already own to move your things. Keeping your clothes in dresser drawers will save you a lot of packing time! Just take out the drawers, tape a blanket or towel on top to keep everything inside, and you’re good to go!

4. Get the Right Tools

Rent a dolly from U-Haul or a moving company, and you (and your back) will be thankful later, I promise! Box dollies are two wheeled, stand upright and are great for moving multiple boxes at once. Flat furniture dollies are basically wooden rectangles with four wheels on them. These babies can hold up to 900lbs and are essential for moving heavy items like large screen TVs and dressers.

Make your life easier and rent reusable boxes from a company like Gorilla Bins or Bin-It. The boxes will be delivered to you and picked up when you’re done with them, saving you the hassle of buying boxes, hunting for used ones or figuring out what to do with them when you’re done.

5. Pack and Load Smart

Don’t leave yourself a mammoth packing job to finish at the last minute or you’ll be overwhelmed and nearly crazy by the end of the day. Plan ahead, slowly packing everything you own over the weeks leading up to the move. Starting with what you rarely use and finish with the daily essentials.

Finally, when loading your truck, remember that heavier items go in first, and on the bottom. Strap everything down and don’t exceed your truck’s weight capacity.

Thanks for reading! If you liked this post, please recommend or share it with others. 🙂

Want to talk? Connect with Moved on Facebook, Twitter, and Instagram!

7 Tips for a Successful International Move

Moving is usually stressful and complicated, but moving internationally is a different beast altogether! After all, you’re dealing with a whole new country, with a different set of laws and regulations, governing everything from banking practices and medical insurance to traffic laws and school systems.

To help you with your upcoming international move, we’ve put together the following list of 7 tips. This is by no means a comprehensive list, but it’ll certainly get you started.

  1. Plan, and budget, far in advance: This is a good tip for any move, but it is especially prudent advice for those moving internationally. The costs of flights and shipping alone call for extreme budgetary measures, and the bureaucratic complications of passports and visas can take months to deal with.

  2. Lock down cheap airfare: Sign up for travel alerts on budget travel sites to receive emails letting you know when your flight is selling for an especially low price. Our favorite sites to use for this are Kayak and Skyscanner. Skyscanner is particularly helpful, as it can find you the cheapest flight in an entire month. Splitting up your travel can save you a lot of money as well.

  3. Stock up on your favorite brands: No need to go overboard here, as you do have to carry all this stuff with you! But if you’re attached to a particular brand of shampoo, peanut butter, candy, face wash, etc., you may want to bring some along.

  4. Stay aware of baggage-weight limits: While you may get lucky and find a nice staff member who will waive your overweight baggage fees, I wouldn’t count on it. Airlines typically charge $50–200 for overweight bags, so plan ahead and pack your bags using one of these handy tools.

  5. Storage or shipping?: While price is an obvious factor in this decision, it also depends on how long you’re moving abroad for, and where you’re moving. For example, if you’re moving to Europe for multiple years, it might be worth it to ship your vehicles and all your furniture abroad. But if you’re moving to Canada for a year-long stint at a new job, you might be better off leaving your stuff in storage.

  6. Pack smart: Certain things you’ll want to keep with you in your carry-on bags, just in case your checked bags are sent to the wrong place!

  7. Carryon bags: Essential items to bring with you on board include: laptops, phones, chargers, medicines and prescriptions, important documents (birth/marriage certificates, medical records, school records, insurance documents, etc.), jewelry and other small valuables.

  8. Checked bags: If you’re freight shipping the bulk of your stuff, your checked bags should include everything you’ll need to live comfortably until the freight arrives. That means clothes, shoes, toiletries, books, toys and schools supplies, etc. If you’re not shipping anything, then your checked bags will include everything else you own!

  9. Research the culture: There are many small cultural quirks you won’t experience or fully understand until you’re actually living abroad, but there is plenty you can learn before you arrive to ease the transition. Ask friends who have lived or traveled there, and scour the internet for helpful blogs and guides. And if they speak another language where you’re moving, 5–10 minutes a day on Duolingo or Memrise can work wonders in just a few short weeks!

For more help with your international move, most of the other guides on this site will still apply to you, so check them out!

Thanks for reading! If you liked this post, please recommend or share it with others. 🙂

Want to talk? Connect with Moved on Facebook, Twitter, and Instagram!

How to Properly Load a Pick-Up Truck for a Move

Moving with a pick-up truck is not quite as simple as tossing your stuff in the back and riding off into the sunset. To avoid damaging your vehicle or losing your items on the road and causing accidents, you need to prepare adequately and load your things safely and correctly.

Here’s how to do so:

  • Don’t overload your truck. Check the edge of your driver’s side door panel for a factory sticker that will list your vehicle’s load capacity, or GVWR. This number will be the vehicle’s weight plus the maximum weight it can carry. So, if your Toyota Tundra has a GVWR of 6200 lbs, and weighs 4100 pounds, then its load capacity is 2100 lbs, including the driver and passengers. If there is no sticker on your door, check the owner’s manual or look online. Whatever the load capacity is, don’t exceed it! You could seriously damage your vehicle otherwise.

  • Add air pressure to your tires to compensate for the extra weight. Too much weight and your tires will start to bulge, decreasing their handling and steering capacity at high speeds. Estimate how much weight you’ll be adding to the truck and check your owner’s manual for details on the appropriate amount of air pressure to add.

  • Load the heaviest items, like refrigerators, stoves, dishwashers, etc., first, and try to keep the weight evenly balanced on each side. Put lighter boxes in the back and on top, but don’t stack things too high, or they will blow off on the road. Keeping the heavy items up front will keep the front of the vehicle weighted down, which helps steering and handling stay effective. I don’t know about you, but I find steering to be pretty important when driving!

  • Disassemble bed-frames, furniture, etc. and tape or tie them together before loading them up.

  • Strap everything down so it does not move around (or fly away!) during the drive, using the holes/hooks in the interior bed. For local moves, simple rope and bungee cords will do fine, but for longer moves, it’s best to invest in some high-quality ratchet straps. You can rest assured your stuff will not move an inch when using these, even if you have to swerve or screech to a halt.

  • Tape all boxes shut, even plastic containers, and avoid packing the truck with lots of random, small items. Small items are more prone to being picked up by the airstream and flying out of your vehicle. Even if you are sure this won’t happen, act on the safe side and keep things securely packed in boxes or inside your vehicle. If anything flies out and causes an accident, it will be your responsibility. If you have no other option, at least use a sturdy cargo net or tarp to keep everything secured.

  • Ideally electronics and valuables should be packed inside your vehicle, so that you can keep them safe if/when you stop for a meal or stay in a hotel overnight. If you can’t fit everything inside, load boxes so that the labels are hidden. You don’t want would-be thieves to be tempted by boxes clearly advertising “Electronics”.

  • Finally, don’t be this guy!

Thanks for reading! If you liked this post, please recommend or share it with others. 🙂

Want to talk? Connect with Moved on Facebook, Twitter, and Instagram!

What to Sell Before You Move

There is something extremely satisfying about purging yourself of clutter. It’s one of the best parts of the moving process. Making money in the process is just icing on the cake!

Because it’s easy to get overwhelmed when trying to figure out not only what you want to sell but what you can sell, we’ve put together the following guidelines. Read on, and make some money!

Electronics

Electronics are some of the easiest things to make a profit from selling. Depending on their age and condition, old computers, TVs and phones are great for some quick cash. Kitchen appliances, like blenders, juicers, and microwaves, are also in high demand.

Use eBay, Craigslist or Amazon for any small electronics, and Craigslist for larger items. In general, you’ll have an easier time selling electronics in their original packaging, and selling phones and computers with any accessories you picked up for them along the way is a good way to increase their value in the eyes of potential buyers.

Video Games

There are many sites dedicated to selling and trading-in video games, and there are always plenty of gamers looking for a cheap new game to try out. Amazon, Craigslist, eBay and Glyde are all great places to sell your old games, either individually or in bundles (best for old games).

Books

Books are a bit harder to sell, but if they’re in demand and in good condition, Amazon makes it easy for you to set up a listing. You’ll have better luck with textbooks, using sites like Chegg.

Clothes

Vintage and unique clothes sell quite well on sites like Etsy, ThredUp and Poshmark. A simple trick with hangers can help you decide which clothes to sell. Reverse all the hangers in your closet, and each time you wear something, flip the hanger around. After a few months, you’ll be able to clearly see what clothes you never wear! Sell these.

Children’s Toys

Games and puzzles still in their boxes are easiest to sell, on eBay and Amazon. Otherwise you could package toys together and sell them as a lot — yard-sales/garage-sales work especially well for this.

Furniture

There are always people moving and looking for couches, beds, dressers, dining room chairs, and the like — you might be one of them! For these sales, stick to local sales on Craigslist or at garage-/yard-sales. Unless you’re selling a highly valuable antique, in most cases the shipping costs of selling a piece of furniture online would offset any money you made from the sale.

Valuables

Antiques and jewelry are tricky. On the one hand, they are obviously worth money, and thus you can be fairly sure someone will want to buy them. On the other hand, correctly valuing used valuables is difficult. Unless you remember exactly what you paid for these items, consider going to a professional to have them valued. Sites like Craigslist and eBay work well for valuable items, though exercise caution when using Craigslist. Meet with potential buyers in public places, during the day, and bring a friend with you if possible. You can also sell valuables at local auctions.

For more pre-move selling tips, make sure to check out How to Sell Things When You Move!

Thanks for reading! If you liked this post, please recommend or share it with others. 🙂

Want to talk? Connect with Moved on Facebook, Twitter, and Instagram!

Moving by Yourself? How to Ask Your Friends for Help

Just because you’re not using a moving company doesn’t mean you have to move all by yourself! What else are friends and family for, if not to help you move?

Follow these guidelines to ensure that the friends who help you move continue to be your friends when the move is done!

Ask Early

When asking your friends for help, don’t wait until the last minute — ask well in advance of the move. Give them a timeframe of when you want to move, and ask when would be convenient for them. If you absolutely need help with heavy items, you’re going to need to be flexible and work around their schedules.

Give Them Choices

Make a list of what you need help with and ask them what they’d like to do. Different friends and family could help with planning, organizing, packing, moving heavy items, or driving. Giving them the freedom to choose is a powerful move, even in small scenarios like this. It gives them some space to do what they want to do, and what they’re best at.

Just be honest when you tell them what you need help with. They’re already doing you a favor by helping out — don’t give them a nasty surprise when they show up!

Be Prepared

Once you’ve told friends what you need help with, and you’ve all settled on a moving date, make sure you’re ready for them. Get up early, have supplies ready and boxes organized, and make sure everything you can pack yourself (clothes, silverware, dishes, small items, etc.) is packed. Unless people have agreed to help you pack, get everything done so that basically all that’s left when they show up is to load the truck.

Keep Them Fed and Hydrated

Keep your friends well-fed and hydrated throughout the day, especially if the weather is extreme. Nothing keeps up spirits like hot coffee on a freezing cold day or an ice-cold lemonade during a brutal summer. Snacks will keep everyone happy and energized so that the move keeps moving.

Make sure to keep your speakers unpacked and the music blasting as well! The whole moving process will go by quicker and will be more enjoyable with some good music. Invite your friends to play DJ throughout the day so that everyone’s favorite tunes are included.

Reward Them Afterward

Finally, consider giving everyone a nice reward after a job well-done. Pizza and beer is fine for college buddies, but if you’re a bit older, or perhaps all your friends are gluten-free, then you need to step it up a notch.

A meal at an established restaurant is always a good idea, or you can personalize your gifts, asking each friend what they’d like (within reason!). Some good ideas: Starbucks gift card, a new book, borrow the Xbox for a week, 2 rounds of drinks, etc.

Remember…

Moving is a long, difficult process, and dragging friends into the mix can be a touchy business. Above all else, remember that they are taking time out of their lives to help you out. Show your gratitude, and be ready to help them move when the time comes!

Thanks for reading! If you liked this post, please recommend or share it with others. 🙂

Want to talk? Connect with Moved on Facebook, Twitter, and Instagram!

Tips for a Stress-Free Move with Kids

Moving can be especially hard for families, no matter what age your kids are. Follow these tips and guidelines to make your upcoming move as easy and stress-free as possible for your kids.

Planning

When breaking the news to the family, explain the reasons for the move, and give space for everyone to react and share whatever feelings come up. Children are extremely sensitive and can easily pick up on your mood, so try to maintain as positive an outlook as you can. At the same time, be realistic — don’t oversell the move and set your kids up for disappointment.

It’s best to simply expect this process to be intense, and prepare accordingly. Younger children may be confused and scared at the thought of leaving the only home they’ve ever known. Older children, more invested in their social circles, will most likely hate the thought of leaving their friends.

Your best bet when moving with kids is to include them as much as possible. The level to which you include them in the planning and decision-making processes, as well as the move itself, will depend on how old they are.

If you have leeway in terms of when to move, talk to your kids about whether they’d rather move in the summer or winter. If you haven’t yet decided where you’ll be moving to, include your kids in the decision-making process. Share whatever research you’ve done this far and compare areas of the country, cities, and specific houses with them. If you’re moving locally, bring them along to visit different parts of town and any houses you’re already thinking of.

Respect how difficult this move may be for your children. Organizing some sort of goodbye party with friends is often helpful.

Packing

As covered in other Moved guides, moving is a perfect opportunity to purge your home of clutter.

Let your children pack their own rooms, or at the very least let them put together a special box of their most important items. Clearly mark these boxes so you can easily find them when you arrive.

If possible, bring your children’s bedroom furniture with you to your new home, as the familiarity will help calm them in your new place.

Depending on their age, assign kids moving tasks to both involve them in the packing process and keep them occupied. If you have young children, consider having a friend, sitter or family member take care of them on moving day.

Stick to your regular schedule as much as possible throughout the moving process. Moving will be stressful and kids benefit from set times for meals, sleeping and waking up.

Unpacking

When you arrive at your new home, take some time to explore the place as a family. Consider playing a game or going to see a movie to lighten things up before diving into the unpacking process.

Get your kids rooms situated as quickly as possible, unpacking their special boxes. As with the packing process, give your kids projects to keep them occupied and ease your own workload.

Give your children (and yourself!) plenty of space and time to fully settle in. Moving is a massive upheaval and it can take a while for life to feel normal again.

Finally, make sure to keep in touch with everyone you left behind!

Thanks for reading! If you liked this post, please recommend or share it with others. 🙂

Want to talk? Connect with Moved on Facebook, Twitter, and Instagram!

How to Deduct Your Moving Expenses

One of moving’s saving graces is the opportunity to save money by deducting your moving expenses on next year’s taxes. Unfortunately, like all things related to the IRS, the process is pretty complicated. Luckily for you, we’ve put together the following guidelines to simplify things.

First things first… Can You Deduct Your Moving Expenses?

To qualify for a tax-deductible move, you need to meet two requirements of the IRS:

1) The Distance Test

Your new home needs to be 50 miles further away from your place of work than your last home was. Or, if you did not have a job (or worked from home) before, your new workplace must be at least 55 miles away from your old home.

2) The Time Test

You need work full-time for at least 39 weeks in the 12 months after the move. If you move late in the year, and can’t fit in 39 weeks before the end of the tax year, the IRS will still let you deduct your moving expenses if you plan to work 39 weeks of a full-time job. If you end up not doing so, you can always amend your tax return later, or deduct your savings as “other income” on next year’s tax return. Also, these weeks do not need to be consecutive, nor with just one employer!

Exceptions to the time test do exist. If any of the following situations apply to you, you are still eligible for move-related tax-deductions:

  • You’re transferred by your employer.

  • You’re fired for anything besides willful misconduct.

  • You have to leave the job due to becoming disabled.

  • You’re filling out the form for someone who has passed away.

  • You’re in the military and moving due to a permanent change of station.

  • You lived and worked abroad and are moving back to the US to retire.

  • You’re the dependent/spouse of a deceased person who worked and lived outside the US, and you’re moving from the deceased person’s home to a home in the US, within 6 months of their death.

You’re also allowed to deduct if you’re moving to the US from a home abroad, and if you’re moving abroad.

To see if you’re eligible to deduct moving expenses, the IRS has a helpful quiz you can take here.

What’s Deductible?

If you meet the requirements above, you can deduct the following expenses:

Travel Costs

  • Gas/oil for your vehicle

  • Highway tolls

  • Parking fees

  • Rental cars

  • Flight/train tickets

  • Hotel/motel charges (does not include meals)

Moving Costs

  • Moving company costs

  • Cost of storage up to 30 days

  • Packing materials: boxes, tape, crating, etc.

  • Costs of shipping pets and cars

  • Costs to insure your goods during transit

  • Fees to connect/disconnect utilities — Does not cover late fees or reimbursable deposits

Note that the IRS clearly states that only “reasonable”costs can be deducted, which basically means only those costs that require you to move directly from your old home to your new one. So if you’re moving from NYC to Boston, you can’t deduct the fuel costs for the detour you take to see your grandparents in upstate New York.

While this article covers most of the information you need to know, head to this IRS page for more details and exceptions, because when the IRS is concerned, there are always more details and exceptions!

Finally, if you’ll be filing your taxes yourself next year, use this form to deduct your moving expenses.

Good luck!

Thanks for reading! If you liked this post, please recommend or share it with others. 🙂

Want to talk? Connect with Moved on Facebook, Twitter, and Instagram!

How to Budget for Your Move in 3 Simple Steps

Step 1: Get Clear on Moving Costs

To set a budget for yourself, you need to figure out how much it’s going to cost you to move. You’re not going to be able to pinpoint an exact number, but if you think about it enough (and keep reading), you should be able to get a fairly accurate estimate.

Start with all the obvious, big expenses. These include:

  • Moving Companies. If you’re planning on hiring professionals, get quotes from 3–5 companies for a ballpark number to work with. Make sure to include whatever extra service options you plan on using: additional insurance coverage, full-service packing, storage, special crating for couches, pianos, refrigerators, etc.

  • Packing Materials. New boxes are surprisingly expensive. You have plenty of cheaper options available, like renting used boxes or picking them up for free from stores. Don’t forget bubble wrap, packing paper, and anything else you might need.

  • Transportation. If you’re driving to your new home, you need to budget for gas, obviously, but also for tolls and food/accommodation for multi-day drives. If you’re flying, budget for plane tickets, checked-luggage fees, over-weight baggage fees, and transportation to/from the airport.

  • Closing Costs. These can be significant if you’re buying a home. Even when leasing an apartment you typically have to provide the first month’s rent, a broker fee, and a security deposit that can be 1–2 month’s rent.

Next, do your best to think of all the sneaky, hidden expenses that will try to mess with your budget. Things like:

  • DMV fees for a new driver’s license and license plates, or to update your vehicle registration. More information on this here.

  • Vaccinations, veterinarian fees, new registration papers for your pets.

  • Missing work — a day’s missed paycheck is basically subtracting money from your bank account!

  • Food and water for friends/family that help you move.

  • Long-carry fees — if you live in the city and they can’t park right in front of your house, they’ll charge you upwards of $100 for every 75ft away from your door.

  • Elevator fees — Your building may charge upwards of $75 for this.

  • Utility security deposits and installation fees.

The more hidden fees you can think of here, the more accurate your budget is going to be.

Step 2: Set Up Your Budget

Once you’ve figured out how much you’re going to spend on moving, it’s time to find the money for it!

The basics of setting up a budget is getting crystal clear on 2 things: 1) what you’re already spending and 2) what you should be spending. Once you’ve done that, you can go about setting your budget and allocating money for the upcoming move.

There are great apps/websites out there that can help you with this. For a deep dive into setting up a budget, check out Ramit Sethi’s guides on the subject. And for help managing your finances, Mint and YouNeedABudget are both great places to start.

Step 3: Stick to Your Budget

This is where the rubber meets the road. While the above guides and websites will help you immensely in sticking to your budget, here are a few easy, money-saving tips to get you started:

  • No buying things in gas stations (besides gas!).

  • Ditch the cable. Use the internet or sign up for Netflix. Or use your older brother’s account!

  • Head to YouTube and learn some DIY home repairs and hacks.

  • Start using coupons: Groupon, LivingSocial, Entertainment, etc.

If it’s too late to create a budget and you need to move cheaply — check out our 7 Tips for Moving on a Budget!

Thanks for reading! If you liked this post, please recommend or share it with others. 🙂

Want to talk? Connect with Moved on Facebook, Twitter, and Instagram!

How to Update Your Address with the DMV

One of the necessary evils of moving is updating your address with the powers-that-be. This process is called “completing a change-of-address”, and one of the many institutions you need to do this with is the good ole DMV.

Hooray!

No matter where you’re moving to, in-state or out-of-state, you need to complete this “change-of-address” process with the DMV. Doing so allows the DMV to update your records, driver’s license, vehicle registration and vehicle title. If you don’t do this, anything the DMV tries to send you will be mailed to the wrong address, and you will get a hefty ticket if a cop pulls you over!

Now what exactly does this “change-of-address” process require of you? What do you have to do?

Well, unfortunately, the answer to those questions is complicated, because the process is different in each state.

That’s right. Each state has different regulations on what forms and tests are required, what fees will be applied, how much time you have to complete each step and what you can complete online or by mail versus what requires an in-person appointment.

While we could make this Moved’s longest blog post yet by listing each state’s information here, instead we’ll point you to an extremely useful database that already has all the information you need.

Click on this link to be directed to the DMV.org home page. Once there, select your state from the drop-down box at the top of the page. On the next page, click the green “Address Change” box at the lower-right corner, and you’ll be taken to a page that will tell you what you need to do to change your address with the DMV in your state.

General Rules

While we’ve got you here, read on for some general rules and tips to keep in mind during this process.

  • Be (very) wary of timelines! While some states are friendly, like California, and give you up to 10 days to inform the DMV of your new address, others (lookin’ at you Connecticut) require a form within 48 hours of your completed move.

  • Filling out forms. Some states require separate forms to update your vehicle registration and title certificate.

  • Inspections and paperwork. Many states require up-to-date car insurance and vehicle safety and emissions inspections results in order to register your vehicle.

  • License plate (in-state). If you’re moving somewhere within your current state, there’s obviously no need to change your license plates.

  • License plate (out-of-state). You may need to pay for a new license showing your updated address. Some states only require you to put on small labels with your new address, and others require no updated license at all.

  • Driver’s license (out-of-state). If you’re moving to a new state, you’ll need to get a new driver’s license. Thankfully, if your license is still valid, often all that’s required for a new one is a vision test.

  • Old plates. Note — some states require you to send your old plates back to a DMV in the state you moved from.

Changing your address with the DMV can be a small step, easily forgotten. Avoid potential fines and add it to your moving checklist!

And head here for more information on who you need to update your address with when moving.

Thanks for reading! If you liked this post, please recommend or share it with others. 🙂

Want to talk? Connect with Moved on Facebook, Twitter, and Instagram!

How to Ship Your Car When You Move — Part 2

Make sure to check out the first article in this 2-part series for information on the different auto shipping options.

Because using a truck is the most common way people ship their vehicles when moving, in this article we’ll give you tips for picking a good auto mover company, and guidelines for preparing your vehicle for shipping.

Let’s dive in!

Picking an Auto Mover

You have two options for finding an auto moving company: carriers and brokers.

Carriers are the companies that do the actual vehicle-shipping. Brokers save you time and hassle by finding carriers for you, for a fee. Cutting out the middle man and going straight to a carrier will most likely be cheaper, but it might take you a while to find a company you like.

For brokers, MoveCars and Moving are good places to start. For carriers, check out Consumer Affairs’ list for the Best Auto Transporters for 2016. You can also talk to any moving company in your area, as many offer vehicle shipping options.

To avoid scams and bad moving jobs, stick with companies that:

  • Are accredited with the Better Business Bureau (BBB) and have high ratings and no complaint histories.

  • Have active USDOT (Dept. of Transportation) and MC (Motor Carrier) numbers.

  • Are members of the American Moving and Storage Association (AMSA).

  • Provide certificates of insurance.

  • Don’t ask for wire-transfer payments.

TransportReviews is a helpful site for vetting auto mover companies.

Preparing Your Vehicle

Once you’ve picked an auto mover, follow these steps to avoid any problems with the moving company or damages to your car:

  1. Wash it — Previous and potential damages will show more clearly.

  2. Empty it — That includes garage door openers, electronic toll-passes, CDs, etc. Some companies allow you to pack things in the trunk, with a weight-limit.

  3. Remove Accessories — Exterior spare tires, grill and car covers, non-permanent bike racks, luggage racks, spoilers, etc.

  4. Disable alarms — Fickle alarms can be triggered during the move.

  5. DO NOT fill your gas tank — Less gas in the tank means a lighter vehicle and a cheaper move! Most companies require you to stay within the quarter- to half-tank range.

  6. Check for leaks — You could be liable for damages if your car leaks all over the car below yours.

  7. Check tire inflation — To avoid damage during loading/unloading and transport.

  8. Take photos — The carrier should do this as well, but it’s always good to have your own photos in case of a dispute.

  9. Lock it after loading.

Side note: Some companies only accept vehicles in working condition, or they’ll require a things like certain amount of ground clearance, a working driver’s side door/window, or working brakes.

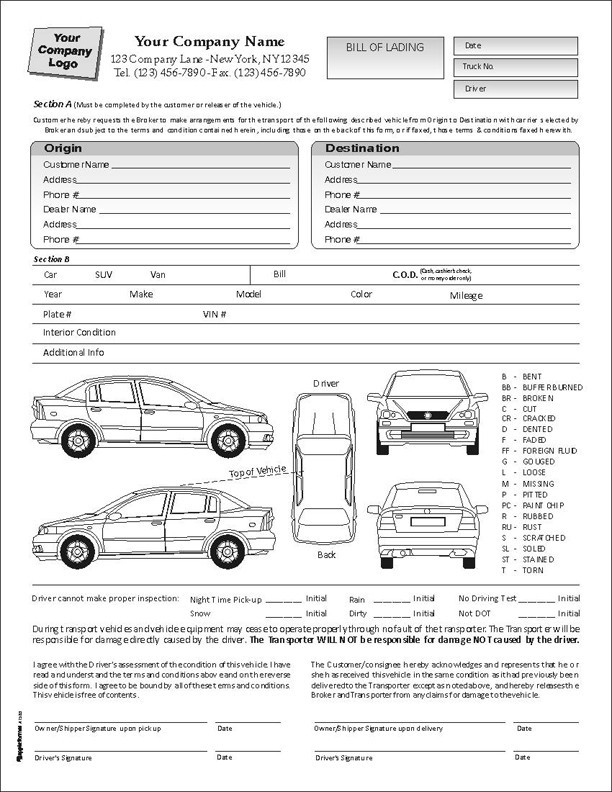
When the time comes to hand over your vehicle, the carrier will inspect it. Most carriers will require you to be present during the inspection. They will record any damages, nicks, scratches, etc. on a “bill of lading”, which they will hand to you.

Sample Bill of Lading


3866b-17gv-k2har4ckpozb0ivfrq.jpeg

Then, when you pick up your car, if there are no new damages, you sign the bill, give it back to the carrier and you’re done!

Thanks for reading! If you liked this post, please recommend or share it with others. 🙂

Want to talk? Connect with Moved on Facebook, Twitter, and Instagram!

How to Ship Your Car When You Move — Part 1

Wouldn’t it be great if you could just fold up your car and pack it in a suitcase? Stuff some socks around the edges toss it in the moving truck?

Sigh…

Hopefully Google is working on that one! In the meantime, you have a number of options for auto transport. Let’s take a look.

On the Road

The most common option for vehicle-shipping is to use a truck. There are plenty of independent Auto Mover companies to choose from, and if you’re already using a regular moving company, many of them also offer their own vehicle shipping options.

Generally, it takes up to a month to ship your vehicle by truck, with rates running from a few hundred dollars to ship to the next state, to upwards of $1000–2000 for a cross-country trip. You’ll be quoted based on the make/model, weight/size and condition of your vehicle, the distance of the move, and your insurance coverage.

When shipping by truck, you can choose between:

Open

Your car is transported on the back of an open truck, just like the trucks you see on the highway transporting vehicles to car-dealerships. This option is cheap, but leaves your vehicle open to potential damage from rocks, weather and leaking fluids from vehicles above yours.

Enclosed

Your vehicle is fully enclosed in the back of a truck. This eliminates any possibility of damage from the elements, but is more expensive. Typically used to transport antique, classic and luxury vehicles.

With Goods

Some moving companies offer to place your vehicle in the same truck as the rest of your things.

Most auto movers give you the option to pay for expedited delivery and a spot on the top row. You can also choose between terminal-to-terminal (where you drop off and pick up your vehicle at a delivery hub) and door-to-door delivery, or mix and match the two.

Finally, while it’s not technically a shipping option, you can also pay someone to drive your vehicle to your destination for you. Some auto mover and moving companies offer this as an option, or you can hire a professional through a company like ProfessionalDrivers, or find someone yourself through classified ads.

Other Options

  • By Train: Shipping your vehicle by freight train is faster and safer, but typically more expensive than by truck. Sometimes it may require extra insurance as well.

  • Amtrak also provides a limited vehicle-shipping option, called Amtrak Auto Train, that runs between Washington D.C. and Orlando, FL. Note that you also have to be on the train.

  • By Air: The safest, fastest and most expensive option.

  • By Boat: A slower, slightly less reliable and usually cheaper option for moves overseas.

Once you’ve chosen a car shipping option, make sure to check out part 2 of this series here for information on how to pick a good auto mover company and how to prepare your car for shipping.

Thanks for reading! If you liked this post, please recommend or share it with others. 🙂

Want to talk? Connect with Moved on Facebook, Twitter, and Instagram!

Photo source: https://photos.icons8.com/

When Is The Best Time To Move?

Picking the right time of year to move can be the difference between a stress-free breeze and a hellish experience you’ll shudder to think of for years to come.

What season is best for you really depends on your particular situation. Let’s take a look at each season’s pros and cons:

Summer

Pros:

  • Peak Season. May-September is when most people are moving. There will be plenty of open listings to choose from, and if you’re selling, you’ll have more potential buyers to choose from as well.

  • No School. Not having kids in school makes it easy for families to move long-distance.

  • Warm Weather. Both house/apartment-hunting and moving day will be easier and more pleasant during the warm summer months.

Cons:

  • Peak Season. You’ll have more people to compete with and less room to negotiate with landlords/agents. Moving companies will also be busier, often overbooked, and will charge higher rates.

  • Hot Weather. If summers are hot and muggy where you live, home-hunting and moving day could be rough.

Takeaway: Plan far ahead, keep an eye on the weather, book moving companies well in advance, and be prepared to act quickly to snag a place before someone else does! This is the best time to move for families moving long-distance.

Winter

Pros:

  • Dead Season. Almost no one moves during winter, which means if you find a place, there will be almost no competition from other buyers and you’ll have all the power during price-negotiations.

  • Cheap Rates. Moving companies are at their cheapest during winter.

Cons:

  • Dead Season. Less people moving means less places available. Selling a home will also be much more difficult during the winter.

  • Cold Weather. When it’s freezing outside, looking for a new place is unpleasant and moving-day is miserable. Freezing weather can also damage items and cause safety hazards.

  • Holidays. They can be stressful enough without dealing with a move on top of it all.

  • School. Most people seem to agree it’s harder on kids to switch schools halfway through the year.

Takeaway: Difficult overall due to the weather and general lack of activity. But potentially much cheaper if you can find an open place. This is the best option for those with a tight budget.

Spring/Fall

Pros:

  • Weather. Both seasons offer generally better weather, less competition and lower moving company rates than summer or winter.

  • Selling. Houses typically sell for more money in the spring.

  • School Shift. If you live near colleges or universities, many apartments will open as students finish school.

Cons:

  • Less Activity. There will be fewer open homes and apartments for you to move into and less people looking to buy.

  • School. Spring/fall are awkward times for kids to change schools. Spring-break is a potential window for families moving locally, however.

Takeaway: Both seasons are less extreme than summer and winter, making them great options for moving for pretty much everyone except families moving long-distance.

Once you’ve picked a season that will work best for you, keep in mind that moving companies are most busy on weekends (when people are off work), and at the end/beginning of the month (when most leases end).

If you can swing it, moving on a Tuesday or Wednesday in the middle of the month will typically be your cheapest option.

Thanks for reading! If you liked this post, please recommend or share it with others. 🙂

Want to talk? Connect with Moved on Facebook, Twitter, and Instagram!

The Best Way to Pack for a Stress-Free Move

If your goal is a stress-free move, you need to pack with a plan.

Rushing around in a frenzy, stuffing everything into garbage bags the night before moving day? Not a great plan. That’s how your things end up broken, forgotten, or accidentally thrown out with the garbage.

The best way to pack for a move is to start early and pack smart. Just follow the guidelines included in the 3-step process below, and you’ll be well-prepared for a stress-free move!

1) Purge.

Start 5–6 weeks before moving day, by taking stock of your things. Decide what you actually want to bring with you, and for everything else, check out our guides on how to get rid of it all. You can give extra stuff to friends and family, donate it to charity, sell it online or set up a garage sale, or simply throw it away.

2) Prepare.

Once you’ve purged, it’s time to gather packing materials.

If you’re using a moving company, they may provide you with everything you need, in which case you’re off the hook!

But if you’re in charge of getting your own packing materials, you’ll need the following: boxes, bubble wrap, packing paper, wrapping pads for fragile items, and — if you’re using cardboard boxes — scissors/box-cutters and lots (and lots) of packing tape.

You can save money and grab used boxes from people on Craigslist who’ve just finished moving, Liquor and grocery stores, and sites like UsedCardboardBoxes. Another, environmentally-friendly option is to rent plastic moving boxes from companies like RentAGreenBox, Gorilla Bins, Bin-It, and JuggleBoxMoving.

Don’t forget you can save space by packing things in your laundry baskets and suitcases!

Finally, take note of everything that you’ll need a special box for, like hanging clothes, guitars, stand-up lamps, cribs, artwork, televisions, etc., and get those boxes as soon as you can.

3) Pack.

Three weeks prior to moving day, start packing all of the non-essential items in closets, attics, and out-of-the-way spots.

With two weeks left, pack the majority of your clothes, dishes, books, artwork, etc.

If you spread it out effectively, then the last week is basically just clean up!

Leave for last an “essentials box”, which will include your valuables and anything you might need during the move or in the first few days after arrival. Options include: toilet paper, toiletries, towels, flashlights, batteries, snacks, bottled water, valuables, a change (or two) of clothes, laptops, phone chargers, basic cooking supplies (plates, cups, utensils, can opener, soap, sponge, etc.) medications, bedding and pillows.

The “essentials box” is also great for kids! Have your children pack their own box with whatever items they deem special. They will love being able to pack it themselves, and you can add to it yourself after they’re done.

A few general packing tips:

  • Label boxes! Use printout labels or a big marker to let future-you know what’s inside.

  • Pack room-by-room to keep things organized.

  • Heavy stuff at the bottom, lighter stuff on top.

  • Fill empty spaces with clothes or packing paper to avoid damage.

  • Wrap fragile items in clothes to save on paper and bubble wrap.

And the last of our packing tips for moving? Don’t forget anything!

Thanks for reading! If you liked this post, please recommend or share it with others. 🙂

Want to talk? Connect with Moved on Facebook, Twitter, and Instagram!